Thursday, July 31, 2008

MAC Basic Brush Set: Great Brushes Without Breaking the Bank!

Although I own a lot of makeup brushes, I haven't bought a single brush from MAC. What a shocking confession, right? However, a cousin of mine gifted me a basic brush set from MAC as a parting gift before I moved to Florida for grad school. She's so cool and I miss her so much! My cousin is the one who introduced me to MAC and she probably has all the brushes MAC has ever made. As much as I love her brush collection, I don't have the budget to get all of them as combined, they are more than my monthly rent! But for the records, I have 20+ brushes in my stash right now and all of them are good.

First thing first, please for the love of makeup, please throw away those sponge tip applicators! They are definitely not your friends! They do not blend your eyeshadows and suck a whole bunch of your precious colors inside as well. Ever wonder why MAC doesn't include them? Because that company loves you and wants you to use brushes to get flawless makeup.

Remember: these are not your friends!

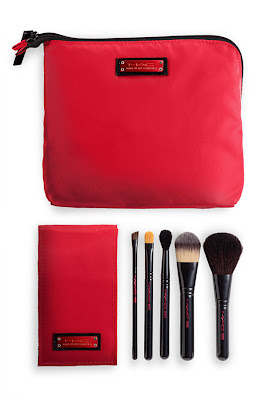
During the winter holidays, MAC always introduce 3 sets of brushes: a basic 5-brush set, a face set, and an eye set. These are usually priced at $49.50 USD and come with a cool tote, clutch, or makeup bag. So for around 50 bucks you get to own 4 to 5 MAC brushes and a clutch. That's a sweet deal, don't you think?

The brushes come in these sets are marked as SE as they are special edition brushes. So what are the differences between the SE's and the regular? There are quite a few notable ones:
  • The price: SE's are sold in sets at $49.50 USD each, so you spend $10-12.50 USD per brush. The full-size, regular MAC brushes range from $20-something to $40-50 USD.
  • The length of the handle: SE brushes have much shorter handles which deem as a problem to those who prefer longer handles. To me, I am quite comfortable with them. As I mentioned before, I have mad skillz!
  • The manufacturing process: SE brushes are machine made and cut while regular ones are handmade and cut. Some said the SE's are not as soft and I do agree to a certain degree. I also find some SE brushes are not as full but you get what you pay for so I don't complain.
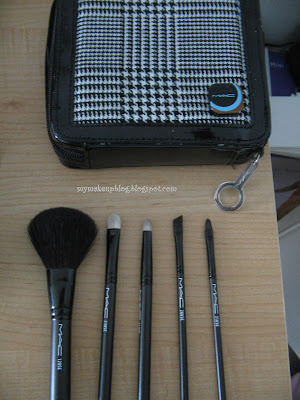
So should we get them? Definitely, especially when you are on a budget. These brushes are affordable and they are from MAC so they last a very long time if cared properly. Comparatively, I think the SE brushes are about 80% as good as the regular ones, which means they are very good compared to the norms. Also, if you just start with makeup, get one of these yourself and lobby your friends and family members to get the other sets for you as gifts. That way you have almost all of the brushes to create many different looks and achieve different effects.

My MAC basic brush set since 2005
The set came in a makeup bag, probably from a MAC LE for Nordstrom as I got it during the summer
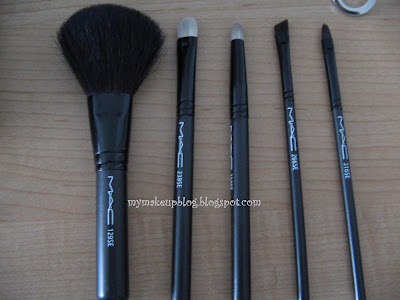
A close-up at the brushes, from left to right:
MAC 129SE, 239 SE, 219 SE, 266 SE, and 316 SE

MAC 129 SE is basically a powder brush that you can use to apply powder foundation, MSF, finishing powder and blushes. In my opinion, this SE brush is not as full as the regular size one and it is not as soft. I find it an OK brush to use but since I have better powder brushes, this guy is pretty much underutilized.
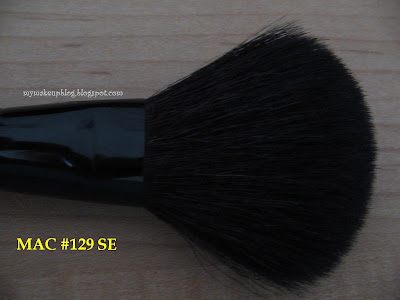
Close-up of the 129SE

MAC 239SE: the basic eyeshadow brush that everybody needs! I am serious, if you haven't bought one, go ahead and get one. This brush packs color like no others and it took me quite a while to get used to it. It is not a blending brush as it's quite stiff and the hair is quite short so take my advice and do not use it to blend.
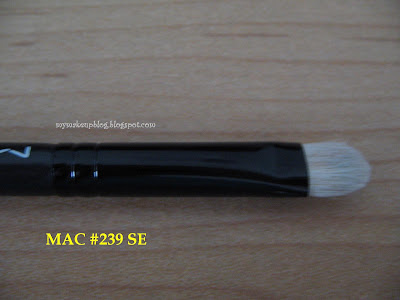
MAC 239 SE: a must-have

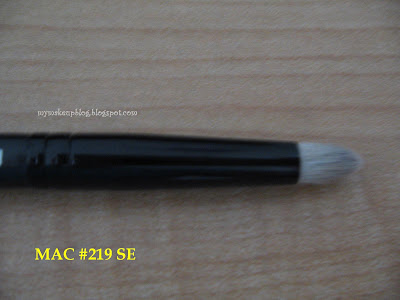
MAC 219 SE: this one is my love! Since I started applying more smokey eyes, this little guy is a charm. It smudges your eyeliner way better than a slanted eye brush and gives you that sultry, sexy smokey look that is oh-so-chic! "Pencil brush, the name is pencil brush!" (à la James Bond)

Want zexy eyes? Get me!
Je m'appel le crayon pinceau!

MAC 266 SE: the small angle brush. This is EnKore's favorite brush, I believe. I kept on hearing him saying "MAC 266" with passion but did not understand what's so fab about this guy. The truth is, it is probably the thinnest synthetic brush I've ever seen! Hence, it is perfect for lining your eyes with powder and fluidlines. It's also good for tightlining and creating that sharp v at the outer corner of your eyes. However, to create a shadow from the eyelid to the outer corner of your eyebrow, this brush is too thin.
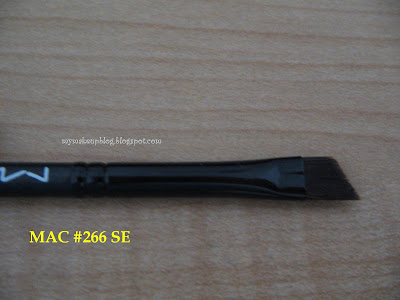
The MAC 266 SE

And finally, MAC 316 SE: the lip brush. It's synthetic and it can be used as a lip brush or a concealer brush. Just wash it before you switch its function. There's nothing special about it, just a lip brush.
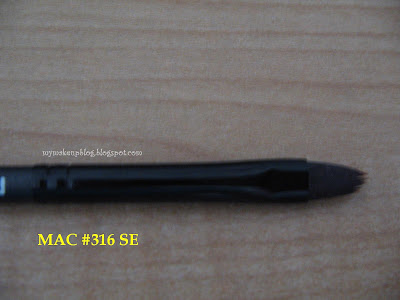
MAC 316SE: the lip brush

Did you notice anything? MAC has a way to label their brushes: face brushes are 1xx (like the powder brush is 129), eye brushes are 2xx (239, 219, 266), and lip brushes are 3xx (316). So if you go on eBay and someone is trying to sell you a face brush that starts with 2-something or 3-something, you know it is a fake one. I think about 10 years ago, the MAC labelling system was a bit different as they only had a few brushes and used two digits instead of three. But those brushes are most likely not on sale today and those who have them are hard-core MAC addicts.

If you want to get a set but do not want to wait until November/December, you can head straight to Nordstrom right now for their Colour Forms brushes. These LE brushes are made especially for Nordstrom from MAC and only happens once a year. This year the basic brush set looks quite promising.
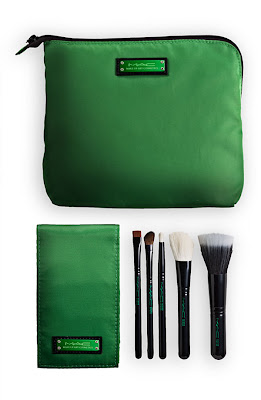
The basic brush set

It has a foundation brush, a blending brush, and a concealer brush. No pencil brush or eyeshadow brush in the set so it's quite a different set here.

The advanced brush set also looks like fun

So there you have it, my take on MAC basic brush set. I adore mine and take care of them well. They still look and feel the same as they were, now that's how good brushes should be. However, the basic brush set is well, basic. You need some couple more brushes to really spread your creative wings. I promise to make an entry about a starter brush kit of you're interested. Just give me a holla and I'll do it for you.

Take care and remember: you don't get the professional look without using the professional tools.
Your Makeup Blogger

Wednesday, July 30, 2008

MAC Starflash and Lustretwins Launched Tomorrow!

Attention MAC fanatics! It's this time of the month again when we all gather our money around and scour to the mall for another round of MAC LE. Yup, our creative gods/goddesses at MAC have answered our prayers and launching two LE collections online yesterday and in store tomorrow. I'm all excited, how about you?

Let's go over the two collections, shall we?

Collection numero uno: Starflash

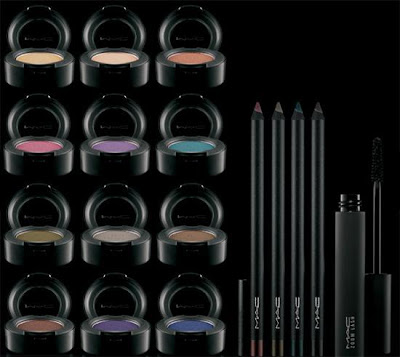
According to MAC, Starflash is "Hollywood's new Power Couple. Our 12 new limited-edition Starflash shadows, combined with Kohl Power Eye Pencil. Shades for a smooth, creamy, cushioned life. Provides the double-wattage impact that will take you to the new stylesphere!"

The collection includes 12 brand new eyeshadows at $14.50 USD a piece, 4 Kohl power eye pencils also at $14.50 USD a piece, and Plushlash mascara ($12 USD).

Notice the price increase here: eyeshadows and pencils increased by 50 cents while the mascara increase by 1 dollar.

I think the eyeshadows have a little bit for everyone: blues, purples, pinks, and neutrals. Right now I am lemming for Star by Night although it looks awfully familiar, Glamour Check!, and Sunset B.

I do not pretty much care about the Kohl eye pencils at all since some of them are repromoted (Feline, a couple of times, Orpheus, and probably Mystery). I do not care at all for MAC mascaras and since they increase by $1, I am not going to buy!

Collection numero dos: Lustretwins

According to MAC, Lustretwins collection provides "nine new shades of Pro Longwear Lustre Lipcolour featuring an exclusive sheer pigment top coat, with three Nail Lacquers. Separate if you must, but these Lustre Twins shouldn't live without each other. Codependent couture colour and shine starts here!"

The name and swatch of the lustretwin lip colors are included in the screenshot. At $20 USD a piece, it's officially the most expensive piece of lippie ever made from MAC. Also, the 3 nail lacquers are $11 USD a piece and "$$$$$ Yes" (pronounced "Cash Yes") is a repromote from Heatherette collection. "Firehouse" may be something new but "Perplexing" looks familiar.

Since I did not get a good product picture online, I had to settle with a screenshot for y'all. Basically, the lustretwin lipcolor has a longwear lustre lipcolor at one end and a top coat at another. From what I heard at Specktra, the longwear lustre lip color was released before and it was quite aweful. I was wondering why I did not remember such a LE release and finally it dawned on me: the initial release failed to make a bang! I do hope this time MAC makes their products a bit better. However, I do not blame on MAC since most longwear lip products are really drying and flaking.

What about me? Will I buy anything from these two collections?

I can see myself owning one or two items from Starflash. However, I'm not sure if I want to own anything from Lustretwins simply because I do not like the texture of those longwear lip colors. I may get "$$$$$ Yes" since I really heart it from the Heatherette collection but that's a big maybe. I'm not a fan of $11 per bottle of nail polish, you know!

Beauties, I do hope you have fun. Gather your cash and get to MAC as early as you can tomorrow. And let me know what you think about these two LE's ok?

Take care and have fun!
Your Makeup Blogger
P.S: Free shipping code from MAC: enter STARFLASH when you check out to receive free shipping, offer ends on 8/09/08.

Tuesday, July 29, 2008

Sephora Beauty Fever Palette: the "Home Away from Home" Kit

I have to admit that I love makeup palettes very much. This love stemmed from a tender age of 5 or 6 when my mom brought home an eyeshadow palette for herself. I remembered being mesmerized by all the colors and dreamed of the day when I could have one for myself. My cousins and I used to take her palette and applied makeup on ourselves, more of them doing it to me as I was the youngest.

Fast forward to 2008 and many palettes later that I owned, I still can't shake off the longing of the perfect makeup palette with eye shadows, blushes, and lip colors. While the market for good single-item makeup is huge, the number of good makeup palettes is small. I've heard about Sephora makeup palette for a while but was chicken out intimidated by the website so I didn't order. On top of that, my apprehension of color palettes is also huge as many of them out there are simple space wasters since they are chalky and lack pigments.

The Sephora palettes really changes my palate as it is compact yet choke full of wonderful colors. If I had to be out of the house for a month and can only bring one makeup item with me besides my foundation, the Sephora Beauty Fever palette is the one.

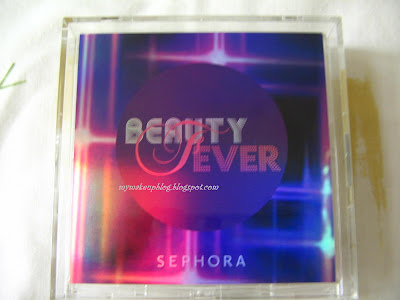
Here is how it looks upclose and personal

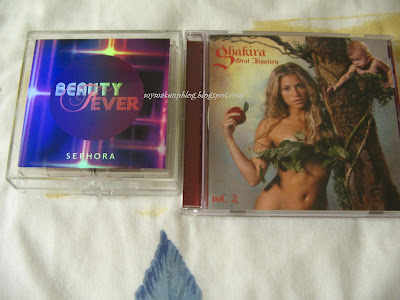
For comparison purpose, I placed it next to Shakira's CD
Although it is smaller than your typical CD case, this palette is 2 times thicker

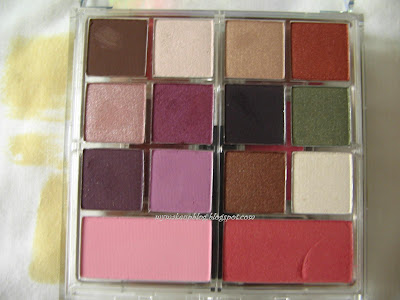
First layer: 12 eyeshadows and 2 blushes

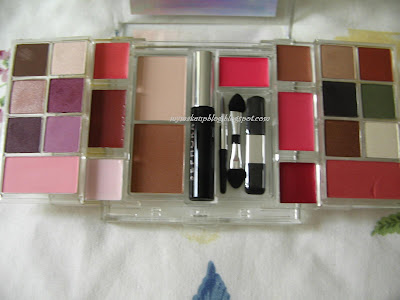
Here's how it looks when totally opened
3 layers of 12 eye shadows, 2 blushes, 7 lip colors, contouring powders, mascara, and applicators
Sweet!

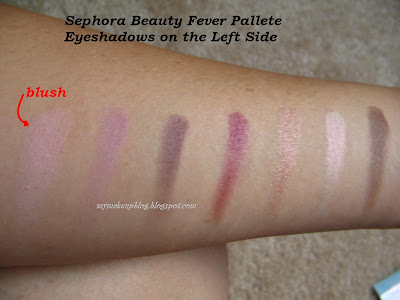
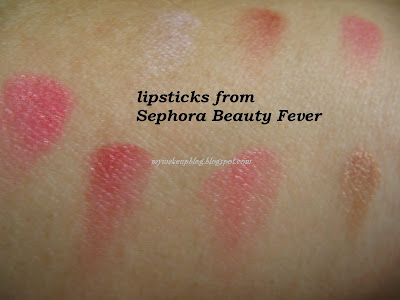
Swatches of the eye shadows and blush on the left panel
This palette has the best purples I've ever seen!

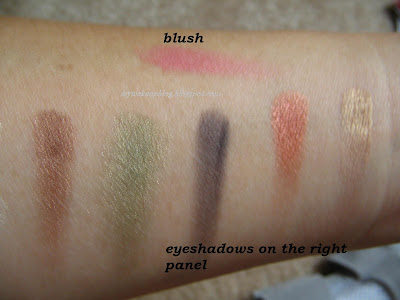
Colors on the right panel
I think I miss one color, argh!

Les lip rouge, 7 of 'em!

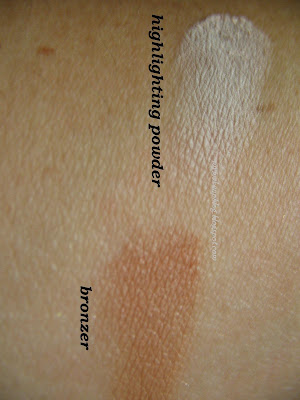
Contouring colors
Somehow Blogger decided to turn my picture side way!
Another argh!

My take on this palette is: it's a good one! It's a good palette for travel, even when you're away from home for months. If you have an eyeliner brush, you don't need to bring your eyeliner with you as well. Also, I think it's a great gift for your younger sisters, friends, and whoever new to makeup and want to learn the blending techniques. The colors are soft and powdery enough for blending yet pigmented enough to show on your face.

The eye shadows are pigmented and soft, therefore good for blending. I was afraid it would be chalky but it's quite silky in my opinion. It has shimmering, and matte colors. The shimmers are not too glittery but really mature sorts. I love the purples! There are 4 of them in there and they go well together. Most purples usually gives me the black eye, just being punched look but these guys are just cute. There are enough neutral colors to keep you moving, a black eyeshadow for those who love smokey eyes and a green one for the jewel-tone lovers. No blues, what a bummer! If you want blues, the Sephora Classic Blockbuster palette is for you. It's bigger, badder, and about $28 USD more!

The lip colors are pigmented but the white one (on the left panel) is not necessary. The blushes are quite pigmented. Since I'm a medium skin tone girl, the darker blush is fine for me. It's a rosy color and quite cute. The other one is light bubblegum pink which does not show on my cheeks as it's too light for me. Contouring colors are ok but not so fab. The bronzer is not glittery so it's good as a contouring powder. The highlighting powder, on the other hand, is not all that as it lacks the shimmer needed in its sort. The little mascara I have no comment since I haven't used it yet.

The little things they called applicators are the ones that I loath. They're just wasting space since they're too tiny and too stiff to use anyways. Sephora should just ditch them and add, I don't know, 2 or 3 more colors in their space. Moreover, what does a palette do without a mirror? I want a mirror, Sephora!

My rating: A, could have been A+ if they ditched the applicators, give me a mirror and some blue eyeshadows!

Price: $20 USD at Sephora.com (to put in perspective, that's 50 cents more than a MAC pigment!)

I *heart* this palette but did not find enough information about it online. If any of you want to purchase it, I will say "Go ahead! It's worth your money!"

Take care y'all and be gorgeous!
Your Makeup Blogger
P.S: What's up with you guys? No love for me? Where are all my comments? Come on! Gimme gimme some comments, will ya?

Monday, July 28, 2008

The 5-Minute Makeup Challenge

If I have to choose between an extra 10 minute of shut eyes and a half hour standing in front of the mirror primping myself in the morning, I will definitely choose the previous one. Trust me people, no amount of makeup can wash the grump out of my face all day long. Aren't we all needing those 5 or 10 minutes in bed before heading out for another day? While most days I would go out without makeup, I think it's important to have a quick makeup routine that makes you look polished and chic in no time. So ladies and gentlemen, may I present you my 5-minute makeup routine!

From sleepy-head to fab in 5 minutes, can you do it?
I think you can!

Ok, you can stop clapping now and let's get to work!

Step 1: Face forward with your tinted moisturizer

Remember my first tip on this post? We do the same here by using tinted moisturizers as they really save us some precious time on blending. Since I started using mineral makeup, I tossed away all my bottles of liquid foundation! So how can I make myself some tinted moisturizer?

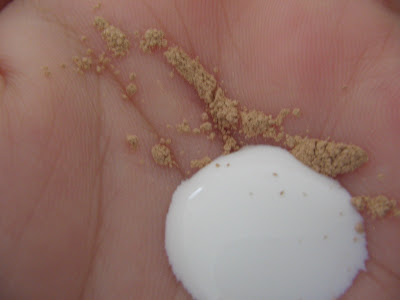
Don't be panic, you still can get the tint you want out of your mineral foundation. However, make sure you check it first to see if it's water soluble. From my experience, Silk Naturals foundation is water-resistant due to the silk powder in there but Everyday Minerals foundation is not. So I squirted a dollop of my moisturizer with SPF on the palm of my hand and sprinkled a bit of EM foundation on it. Then I mix them together to create my own mineral tinted moisturizer!

Moisturizer and mineral foundation on the palm of my hand before mixing them together

Step 2: Eye time by applying cream eyeshadow to all over your eyelids

I love MAC Paint Pot in Bare Study to do this job. It glides smoothly on my eyes without tugging the skin and creates a lovely and sheer wash all over it. This color is so popular that it's hard to find these days. It's also a fave in wedding makeup.

Step 3a: Line and smudge your eyes using a creamy eye liner

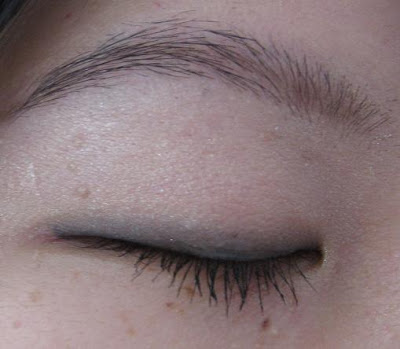
Since we totally skip the 10 layers of eye shadows here, the eye liner is a good way to make your eyes pop without using lots of colors. In my early days, I did not get to own a lot of eyeshadows so my brown eye liner was a godsend. I can draw a chubby line and use a Q-tip to smudge the line as close to the lashes as possible. Moreover, the line doesn't need to be precised either. You can use eyeliners in black, brown, dark navy, dark purple,... whatever color your heart desires and smudge the heck out of it with your Q-tip or your pencil brush (ie MAC 219, my fave!)

Step 3b: Fix your eyebrows

If the eyes are the windows to your soul, the eyebrows are the Golden Gates of your face. Fixing your eyebrows with some clear brow gel really makes your eyes stand out more and gives you a polished look fast.

Step 3c: Swipe some mascara

Using a curling mascara to save you time, applying one or two coats of mascara on your lashes.

Step 4: Blush up baby!

Apply your favorite blush to the apple of your cheeks. Since we're going for a quite minimalistic look, a bit (or a lot) of blush really makes a difference. I opt for a lot because blushes can brighten up my face with minimal effort.

Step 5: Paint your pouty lips

I prefer lipgloss for this job as they do not require a lot of application time: swipe and go! However, if you're heading outside on a hot day, a tinted lip color may be better as it holds the color longer. For me, I love Black Honey or any of the Clinique Almost Lipsticks as they give both shine and color.

That's it, time's up! Within 5 minutes you can look polished and ready for the day. The time you save can be used for those precious minutes in bed or to beat the traffic.

Have a nice week ahead everyone!
Your Makeup Blogger
P.S: related posts that you may find interesting

MAC Paint Pots
Clinique Black Honey Lipstick
How not to melt in the sun

Sunday, July 27, 2008

I Love Lucy Liu

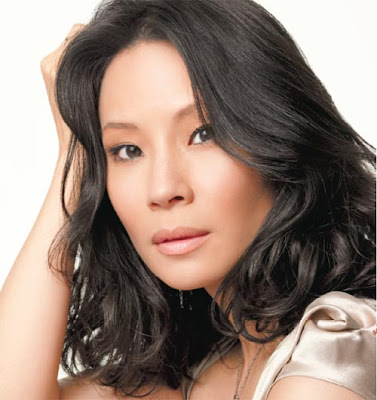
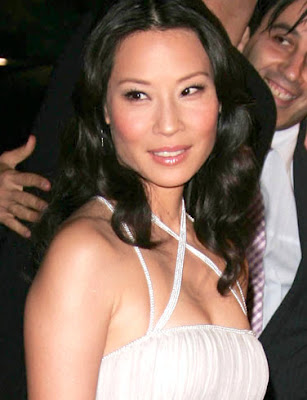
Being an Asian girl sometimes put me in a disadvantage position when it comes to makeup. There are not so many Asian movie and TV stars these days. The ones I know are Lucy Liu, Bai Ling, BD Wong in Law and Order, Masi Oka in Heroes, and George Takai. There are probably more but I can't think of any right now. To be honest, I don't like Bai Ling's style that much. Lucy Liu, on the other hand, has a great sense of style and her makeup always look flawless yet effortless. Morever, we have the same eye shapes! Score!

Like Lucy Liu, I have a pair of deep set and monolid eyes which deems some certain challenging qualities. First of all, my eyes do not have folds so I basically have to guidlines when it comes to creases. I just guess and apply. Secondly, when trying to bring the deep set eyes forward, they can also look smaller with dark eyeshadows. Moreover, my eyes are small so I don't have a lot of real estates to apply eyeshadows the way I want. Opening up the eyebrows does help a bit but it's not everything. So with small and deep set eyes, it is hard to work with and I've seen many MAC makeup artists stumbled when they applied makeup to my eyes.

But my girl Lucy has the best solution for our type of eyes. It's called K.I.S.S (keep it simple, stupid!) She does not put a lot of eyeshadows on her eyes but concentrate more on her cheeks. She has killer cheekbones by the way. She also keeps her lips very neutral as she does not have lips like Julia Roberts that shows all of her teeth.


I love this look: it's simple, it's fresh, it's effortless. She does use mascaras to ascentutes her lashes. This is a very effective way to bring out the deep set eyes. No wonder why I've been smitten with mascaras since forever. It's all about the eyes, baby!


In this look, if you look closely you can see her freckles. If you know Asian people, most of them hate freckles. They would use cremes to remove the freckles and apply heavy makeup to cover them. Lucy Liu, however, does not do that. From the way the picture looks, she does not seem to have heavy makeup at all.

Lucy Liu sported the smokey eyes in this picture. Her smokey eyes are perfect as they are not too dark. She also used fake lashes to ascentuate her eyes and again, she concentrated more on the cheeks. You can see her freckles as well.

There I said it: I love Lucy Liu! I think her makeup artists (or even herself) did a good job on the makeup. The K.I.S.S way does work wonderfully in our type of eyes. After realizing I have the same eyes as she does, I just stopped trying too hard to achieve some certain looks and accept the way I am. Beauty comes in different shapes and sizes, you don't need to look a certain way to be considered beautiful.

Some of my favorite quotes:

"Pretty is something you're born with. But beautiful, that's an equal opportunity adjective."
- Annonymous

"Beauty is how you feel inside, and it reflects in your eyes. It is not something physical."
- Sophia Loren

So our message of the day is K.I.S.S. It works on Lucy Liu and many other celebrities, it should work on us too!

Take care and be beautiful,
Your Makeup Blogger
Saturday, July 26, 2008

A Little Bit About Me

I think it's time for me to tell you a bit about myself since I've been blogging here for almost a month now. First of all, it's really nice to finally blog about makeup, my hobby that so far takes a chunk of change out of my pocket. Before starting My Makeup Blog, I've had other blogs but mostly just for myself and to keep in touch with friends and family members. Then as I grew older and ventured out to a different path in my life, my needs started to change as well and oops came another blog. This one is the result of my passion for makeup and I'm glad I finally convinced myself to open it.

When I was a child, my favorite pass-time was to watch my mom applying makeup. She was a teacher and her job required her to look presentable in front of her students. At that time, nobody had a spectrum of lipsticks like we all do today. And neutrals were not even popular! Mom had three lipsticks: a red one, a really pink one, and an orange one (like the color of that Neo Sci-fi package!) She used them interchangeably based on the clothes she wore that day. On top of that, I remember her having a rouge (that's an old skool term for "blush" people!) and it was a baked blush that was really red. Her eyeliner was liquid as it was the 80s and she had *I think* some jewel-tone eyeshadows. Mom was my idol as she always looked gorgeous. And she also had permed hair! Talking about the 80s!

My mom is very beautiful but unfortunately the beauty gene skipped me as my phenotype* is more from my dad's side. My dad, by the way, got his look from his mom so I actually look a lot like my grandma: the eyes, the face, the nose, the cheek bones. Growing up, people teased me about my tiny eyes and flat nose. Until recently, a family member suggested me to save up my money to get rhinoplastic** and blepharoplastic*** surgeries. But as I know myself better, I don't like going under the knife so surgery is not an option.

But makeup is!

And luckily during my childhood years, mom and dad sent me to painting classes so I know how to pick colors and handle the brushes very well. So it became organic for me in my early 20s to pick up the brushes and apply makeup on myself. However, thanks to dad's gene, I don't have the perfect skin in the whole world so I have to wiggle around a lot to make myself look better. It took me a while to get there but I'm quite there these days!

When I started wearing makeup around 2002, there were not a lot of foundation colors available. And since most Asians prefer the pale look, I ended up wearing ivory shades of foundation! The horror! At that time, there was no cool/neutral/warm tones to select yet so I could not find anything that matched my yellow undertone. It was quite a struggle just to get an OK foundation for me. But from those days I've learned a lot about makeup and now I can comfortably pick matching foundation not just for myself but for others.

Nowadays, makeup blogs are everywhere and most bloggers do wonderful jobs to help out other people who are interested in beautifying themselves. Just to think of how much I've experienced in my past journey really motivated me to start this journey and I'm glad I'm not alone. I hope that I will stick with this blog as long as I can get awesome makeup to play with. So I'm asking you this: will you stick with me too?

Yay or nay, give me a hola in my comment box ok?
Your Makeup Blogger
P.S: geek terms explained

*Phenotype: outward, physical manifestation of an organism. In layman term, it's how you look!

**Rhynoplasty: nose job, for Asians is to have a more Western-looking nose and the #1 most common plastic surgery done in Tehran, Iran.

***Blepharoplasty: eyelid surgery, one of the top three most common plastic surgeries done in Asian countries.

Friday, July 25, 2008

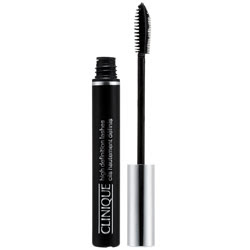
Clinique High Definition Lashes: Hot Lashes 4U!


Before I used Cover Girl LashBlast, there was a time that I struggled to find the "it" mascara. Usually found in my makeup stash were 3 to 4 tubes of mascaras that I used at the same time: one for length, one for curl, one of volume, and one for color! Yup, you got it right, it was obsessed with my lashes.

One of them was the awesome Clinique High Definition Lashes mascara that I got from a gift with purchase package. This mascara is almost all I wanted and if I didn't find LashBlast, it would have been my "it" mascara until today. But don't worry, it's on my top 5 list of all-time favorite mascaras.

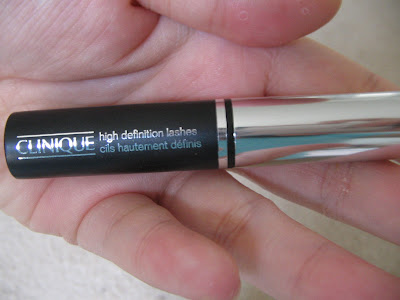
What I got was a "try me" sample of the High Def mascara that's a bit bigger than my finger. Whoever named this mascara must have done that during the football season as the name reminds me of the HDTVs. Aren't everything in high def these days? And when we have high def TVs, we need high def mascaras to go with them. Matchy-matchy, sounds cool isn't it?


As you all know me, my judging standard for mascaras are the 3B's: bigger, bolder, better. How does the High Def mascara stand based on my ground? Very close to perfection, let me break it down for you:

1. Bigger: it does give me longer lashes and creates some volumes. My lashes felt glossier than usual. Also, the formula is gentle on my lashes which is rare in mascaras these days. They all feel like they strip the moisture right off your precious lashes.

2. Bolder: not really, you're not going to have fantastic lush lashes from this mascara. Unlike LashBlast, it does not fan out your lashes or fatten them up. This High Def mascara just gives you lots of lengths, no curls, and not so much volumes.

My nekkid lashes (before)
Taken with no flashes under incandescent light (hence the yellow hue!)

After 2 coats of Clinique High Def
Picture taken without flash in natural light

You see, in the 2nd picture the lashes look longer but they also start to clump. I did not curl my lashes just to test its curling power and this baby has none, giving me stick straight lashes.

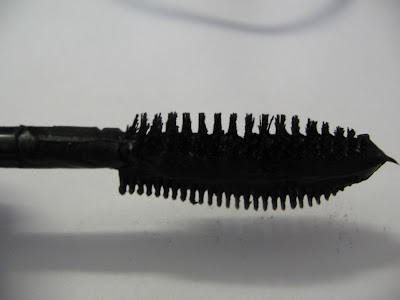
3. Better: I give props to the Clinique people for being innovative in their designs. The mascara wand is the best I've ever seen, and I've seen a lot of mascaras! It has 2 sides: a wand side and a comb side. You apply the first layer of mascara using the wand side and then flip over to the comb side to beef up your lashes. However, I found this instruction a bit obsurd as the comb really deposit more mascaras to the lashes and makes them clump up together. Therefore, I do everything in reverse direction: comb then brush and voila, less clumps!

The awesome brush: the brush side is on top, comb side is at the bottom.

Here's a quick recap on the pros and cons of the Clinique High Definition Lashes mascara:

Pros: this mascara is for you if you...
  • are looking for a lengthening mascara;
  • have sensitive eyes;
  • do not need a waterproof mascara;
  • want glossy lashes;
  • like the brush-comb wand applicating combo;
  • love Clinique!
Cons: this mascara is not for you if you...
  • want a mascara that provides you bigger, bolder, and better lashes (remember 3B's!);
  • want some curling and volumizing action from your mascara, because this baby gives you none of them;
  • have $14 USD in your pocket: it ain't cheap people! One of this equals to 2 of the LashBlast, you do the math and I trust you to choose wisely;
  • have oily skin and/or live in humid places: the high def, although a good mascara, will smudge on you. And who wants racoon eyes, right?
I have to say I love this High Def mascara but it doesn't really live up to its name. It's more of "better than the norm" sort, not really HD yet. Once in a while when I want an easy-going look, I would grab this mascara. Other than that, I stick with my LashBlast.

That's it for today folks! How are you doing so far? Just one more day until the weekend so hang in there ladies.

Until next time,
Your Makeup Blogger
P.S: some related posts in the past:

Cover Girl LashBlast: Bambi Eyes in a Flash: come and read what I said about my "it" mascara.
How not to melt in the sun with bonus picture of the very hot Roger Federer.

Thursday, July 24, 2008

Frugal Beauty Tips of the Day

With our current economy situation and gas prices, everybody's concern is "gas vs. food". Since gas is more than $4 in my area and around $5 in others, it takes out a big chunk of cash from everybody's monthly budget which leaves less allowance for entertainment and beauty products. As I am a graduate student, my monthly income is below the poverty level. Being a makeup addict doesn't help my wallet at all. Today, I'm going to disclose my tips to maintain my beauty budget without breaking the bank. These tips may cost you less than $5 and two of them actually costs you nothing!

Tip #1: Shop at discount stores

The Dollar Tree is my favorite "hunting place" as everything is a dollar. I really feel like a hunter-gatherer when I go there. The one near my place has a long aisle of makeup products, ranging from Cover Girl to Maybelline to LA Colors and even Physician's Formula. I sometimes found some nice lip glosses, lipsticks, eye shadows that are still in wraps. Those products are sold at full retail prices at the drugstore but only priced for one dollar at Dollar Tree. At first, I thought there was something wrong with them but after spending a dollar on a lipstick and didn't die from lead poisoning, I came back for more.

Big Lots also has a stock of makeup, beauty, bath and body, and even skincare products. One time I got a conditioner from Nature's Gate for $1.50 USD. The brand decided to change their packaging and offloaded the products in old containers to Big Lots. The same bottle would have cost me an arm and a leg at my local health food store.

My advice if you decide to hunt for goods at these places, you need to be really selective. After all, these are the products you are going to use on your body and probably ingest some of them as well (lipsticks and glosses). Therefore, you don't want to buy from brands that you're not familiar with. Also, if the consistency of the products does not look right, it does not worth your pretty dollar.

I've heard some stories of people got MAC shadesticks from the dollar store. I've been searching for that elusive shadestick from my local Dollar Tree as well!

Tip #2: Don't forget your Vaseline

Our favorite glam girl Tyra Banks, the creator of America's Next Top Model and The Tyra Banks Show, uses Vaseline y'all! If Tyra, the one who has everything, uses Vaseline and looks gorgeous, why shouldn't we?


Unlike what people thought, Vaseline is not clogging your pores. Also, it is a very versatile and many makeup artists use it. Let me point out some possible use of Vaseline to y'all:
  • As a moisturizer: Tyra uses it as her eye cream, I use it as my lip balm, and my roommate uses it as her foot cream. It works wonder on chapped lips, cracked heals, dry cuticles,...
  • As a natural eyeshadow: it gives a glaze when applied on your eyes. So when you're crunch on time, just swap some Vaseline on your eyes and off you go;
  • As a base for lip gloss: you can mix some of your favorite mineral blush colors to a pot of Vaseline and voila, your custom-made, one of a kind lip gloss. Mix some avocado oil or olive oil for extra shine if you want.
And if you purchase a jar of Vaseline at your local dollar store, it only costs you a dollar and lasts a very long time!

Tip #3: Look for sales and deals

I love sales and try to squeeze as much out of them as possible. Most if not all of the stuff I have come from sales. Since I'm living with limited income, I need to stretch my money very very much. And I do get satisfaction out of getting things for much cheaper than the regularly marked prices. For makeup, the local drugstores are great as they always have "buy one get one" sales. Target has sales on Olay skincare products almost every week. It also has 30-75% off in some items that are in the sales area. Walmart has gift with purchase items so you get 2 items for the price of one.

Also, don't forget your coupons in the Sunday magazines. Once I got a mascara from Max Factor for $3 after using my coupon and store discount. The cashier scanned the mascara 3 times to make sure the total was correct. That's what I called "shop victoriously" ladies.

For online deals, I always look for free shipping because it's annoying to wait for the box to come while you pay for it to ship. If free shipping comes with a restriction, I would consider if it's worth it to place an order. Remember: always take shipping into consideration.

Tip #4: Get free samples

Most department stores and drugstores have free items for customers to try. Drugstores always leave them out and you're free to take one (d0n't be greedy, think of the people that comes after you!) However, you have to ask for samples at the department stores. I always ask for perfume samples to try. One time I asked for a skin care sample from Clinique. And I asked for samples at MAC all the time (when I make a purchase, of course!). With a right look and a right smile, those samples will be yours.

I always be nice to those sales associates when I ask for samples. My line is, "Excuse me, I like this perfume/skin care product/color so much but can I please have a sample to try just to see if it's suitable. If it works, I promise I'll come back to get it!"

If they have samples in stock, they should give you some. If not, they would tell you they do not have. Just be nice to them either way since SA's make money out of sales commissions.

Tip #5: Use what you have

Almost everyday I have an urge to buy something new. It's like a disease y'all and as much as I'd like my money to stay in my pocket, sometimes the force is just too strong. So every two weeks or so, I do a product inventory check. I just simply pull everything I have out, touch them, pet them, check them, classify them based on colors, texture, brand and then put them back. Usually, at the end of this ritual, I come to my realization that I have a wad load of makeup and skincare products to use! So why the heck I need to bring more of them home?! And by doing so, I realize my color purchase pattern, that I prefer one group of colors more than another and I simply have so many neutrals now that I don't need to buy any of them anymore!

Believe me, since I started doing this, my wallet has been happier and I have been a saner makeup addict. Now I know I need more greens and some purples so on my next purchases I'll concentrate more on them. In a weird sense, doing a product inventory also keeps me grounded and makes me feel proud of myself.

That's it ladies, these are my 5 tips to help you from overspending your precious cash. Who knows when gas will go down ever again. And who knows if gas price will ever go down at all! Until then, it's good to keep your money tight.

Stay pretty y'all and if you have any tips, please feel free to share.

Love,
Your Frugal Makeup Blogger
P.S: thank you Stephie for adding me to your blog roll! Her blog probably was the first makeup blog I read and she is so nice and talented. If you go to her blog, please tell her Dao from mymakeupblog says hi!

Wednesday, July 23, 2008

Shocking News: MAC increased eyeshadow price!

Lately I haven't purchased anything from MAC because I am a good girl y'all. So I have no clue if anything has changed at all. Recently I kept seeing other beauty bloggers posting the price of MAC eyeshadows as $14.50 USD a piece and I'm wondering what's going on.

My click to MAC website confirmed that the eyeshadow price indeed has increased by 50 cents! Outrageous! Now we all have to pay more for our vanity! This is insane!


There may be some explanations to this price increase:
  1. The Canadian dollar vs. the U.S Dollar: Uncle Same hasn't been doing so well and now 1 USD is less than 1 CAD. MAC, as well all know, is a Canadian company. Therefore, the price increase may be the result of the currency exchange rate.
  2. Gas price: I'm not going to put my environmental policy knowledge out here and write another paragraph. We all can blame Uncle W. on this.
Since 2006, MAC has increased their eyeshadow price by $1.50 USD! I wish these days has come back again! So the next time MAC offers another Friends and Family sale, let's stock-pile their eyeshadows, shall we?

In the mean time, let's not rely too much on MAC. When the world is discovering alternative fuels, us beauty and makeup addicts need to inform others on alternative makeup sources.

Take care ladies and let's all pray for a better day!
Your Makeup Blogger
P.S: When you shop at MACcosmetics.com, please enter offer code NEWVIEW at checkout for free shipping. Offer is good until 7/26/08.

Tuesday, July 22, 2008

MAC Paint Pots: My Pride and Joy

Hypothetically speaking, if I could choose to bring one eye color on an island, I would choose to take Bare Study paint pot with me. As you know how excited I am when it comes to MAC, my utmost favorite product is no other than the paint pots. Introduced to the market in August 2007 via the "Painterly" collection, paint pots have quickly become the favorite items of many MAC fanatics. These pots are creamy eyeshadows that does not crease, fade, budge, cake, or smear! Also, paint pots are superior to shadesticks and paints as they are easy to apply and highly blendable.

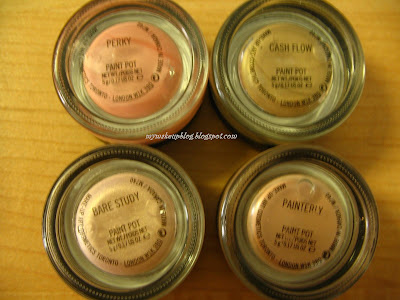
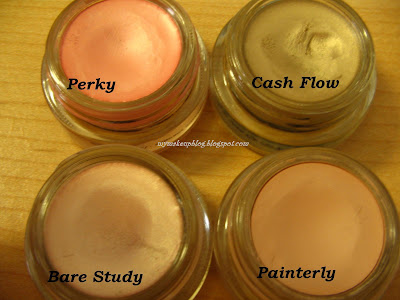
After hearing a lot of praises about these paint pots, I bought my first one, Painterly, at the end of last year. Then when Fafi collection came, I bought Cash Flow and Perky. I was very lucky to get Bare Study as well since this color has become a cult favorite and gets sold out pretty fast online and offline.

The best way to store paint pots is to put them upside down

How they look in the pot. Pretty, right?

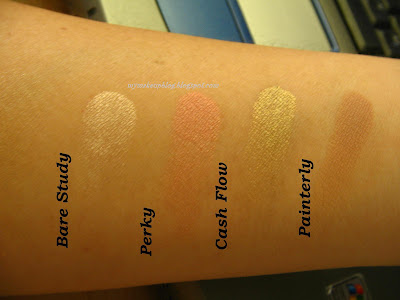
Each paint pot took $16.50 USD out of my pocket. As gorgeous as they are, their prices aren't cheap. However, these babies sure will last me a long time. After intensive use, they barely make a dent as you can see above. These colors are good to use as eyeshadows. However, they are perfect bases to intensify your eyeshadows. When coupling with a different paint pot, your eyeshadows do change a little bit. For example, browns and neutrals with flecks of gold/yellow will show more gold/yellow when applied on top of Cash Flow.

A swatch of all the paint pots I have. A very little amount was used per swatch.

As pretty as they are, paint pots are still expensive in my book. So I set foot to find a cheaper alternative in the drugstore and ding ding ding, there it was in full glory and 50% off...Maybelline NY Dream Mousse shadow!

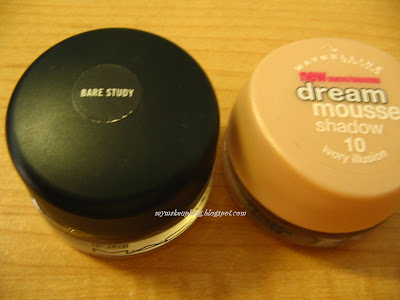
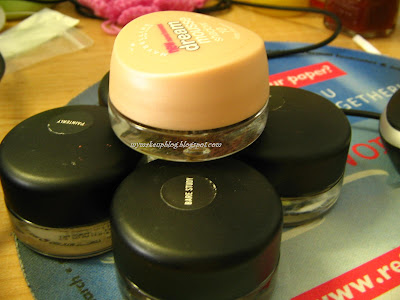
Bare Study vs. Ivory Illusion

At full price, each dream mousse shadow costs around $6 USD. That day at CVS, yours truly paid 3 bucks for Ivory Illusion as I thought it would be a good dupe of Bare Study.

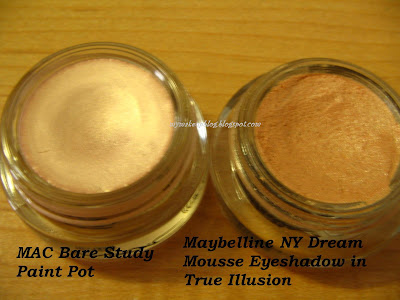
Two contenders in their own territories

Texture-wise, Bare Study is a cream while Ivory Illusion (not "True Illusion" as the caption indicated!) is a mousse. Therefore, it is much softer and you need to use more. Also, Bare Study weights 5 grams will the other one only weights 3 grams. So they actually cost the same as you get more use out of the paint pot than the mousse shadow. Ivory Illusion is more sparkling than Bare Study as well. If you like sparkling base, this one is for you.

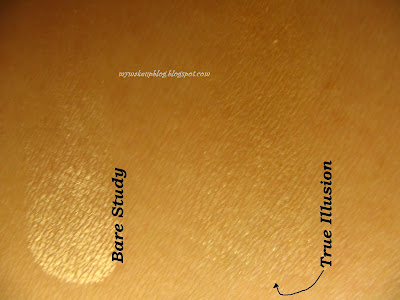
The swatch: now I know why I kept on typing "True Illusion"
The color totally disappeared on my arm! And I used a chunk of it!!!

So how does the poor guy hold up? Pretty well, I need to say. One day, like a mad scientist, I applied Bare Study on one eye and Ivory Illusion on another then proceeded on my eyeshadow application routine. I spent about 3-4 hours shopping in the Florida heat and humidity. When I came back, the side that had Bare Study was the same while the other side that had Ivory Illusion smudged a tiny bit. So for my $3 spent, I was quite happy.

My ratings: A+ for the paint pots, B+ for the mousse shadow. The mousse could have been rated higher if I did not have to use a lot and it held up my eye colors better. For the price, I'm quite happy.

Maybelline NY has about 6 colors for these mousse and it does look like they are closing it down. I kept seeing the "Last chance item" at the drugstores and Walmart. So when it hits dollar stores, we all know what to do, right?

Bonus picture for y'all
I love that Maybelline put the color on the cap. MAC just uses their black lid and forces me to invert the pot to find the color!

That's it for today. I love paint pots and they're in my top 5 right now. But for the price I paid for True Illusions, I think it holds up pretty well. So there we have a splurge and a steal. I hope you enjoy this entry and please give me some comments. You know I like them!

Have fun!
Your Makeup Blogger
Monday, July 21, 2008

MAC Solar Bits: an intriguing experience

In June 2008, our most beloved Canadian cosmetic company MAC did it again by releasing 3 LEs in one day: Neo Sci-fi, Solar Field, and Future Earth. While I got nada from Neo Sci-fi and Future Earth, I hauled two solar bits from the Solar Field collection home. I guess this is no longer hot and heavy news for all of you out there as these 3 LEs has been on sale for more than a month now and all the solar bits have been sold out online. To me, I love these solar bits to bits (pun intended) as they are very interesting and unique materials.

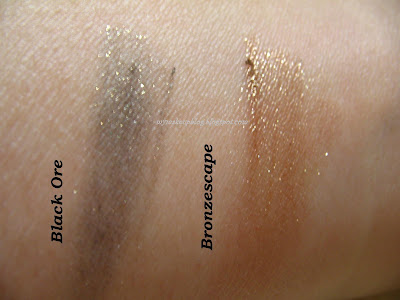
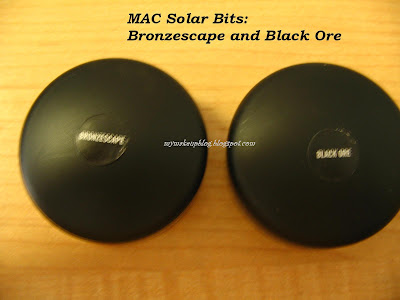
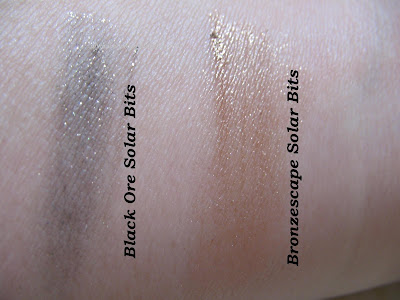
The two solar bits I got are Black Ore and Bronzescape. While many other bloggers out there do not enjoy the solar bits (EnKore included), I beg to differ. To me, these little guys are pigments on steroid and worth every single pretty cents I paid. I think MAC creative department really outdid themselves when created these solar bits because they really blow pigments out of the water. You can lightly brush them for a light and sheer shimmering effect or crush them for intense sparkles. Either way, they are way more pigmented than them pigments and cost the same.

Here's how the jar looks.
I always peel off the stickers on the box and stick them on similar items.

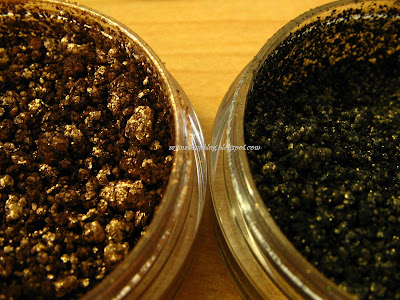
Interesting texture: very chunky and sparkly

Swatch under natural light

Swatch under neon light: they spark like mad

The only downside of the solar bits is they fall down like crazy! Unlike MAC pigments, these guys do not have strong adhesive power so you really need a base to hold it. The MUA I talked to recommended shadesticks, MAC prep and prime, and was excited when I told her I use paint pots.

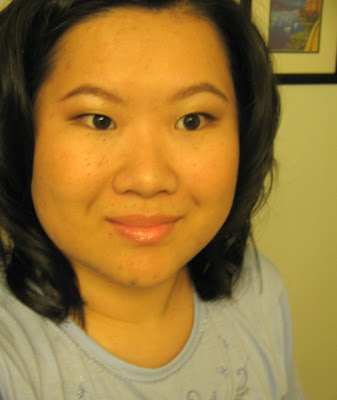
On my birthday, I decided to use Bronzescape as it is so gorgeous. I always incline more towards Bronzescape than Black Ore. The former one is a clear bronze color with golden brown pigment while the later one is black with gold pigments, hence more suitable for smokey eyes look.


What I used: it's been a while so it may not be accurate

1. Eyes:
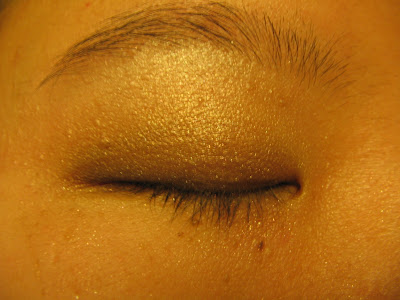
  • MAC Bronzescape solar bits on the lid with #239 brush: I only use a very tiny amount and use it as a wash instead of an intense eye color;
  • Milani Sun Goddess as a contouring color with Sonia Kashuk blending brush: this color is similar to MAC Amber Lights for those who are wondering;
  • Milani Java Bean(s ?) near the lash line with #219 brush;
  • MAC Warming Trend (from Cool Heat collection) as a highlighter;
  • MAC paint pot in Bare Study as a base.
  • MAC Teddy eye kohl
  • Cover Girl LashBlast mascara
Here's how it looks

A quick schematic for those who are interested

2. Face, etc:
  • Silk Naturals foundation,
  • Shu Uemura blush in P Brown 76,
  • Everyday Minerals silk dust as a finishing powder,
  • Everyday Minerals summer silk dust as a contouring color.
3. Lips:
  • MAC Viva glam V lipstick,
  • MAC Sock Hop lip glass (from Heatherette collection).
I truly like these solar bits and use them sparingly because who knows when these guys will come back. And they are so concentrated that a fleck goes a long way. I tried to apply Black Ore wet once and it looked glamorous. Also, wet application solves the flecking problem but the texture does change. I hope the schematic helps. I'm not a schema-wiz like Karen from Makeup and Beauty Blog but I'm trying.

Happy Monday ladies! I wish you a productive week ahead!
Your Makeup Blogger
Sunday, July 20, 2008

7 Days and 7 Nights of Mineral Makeup: Urban Apothecary

Happy Sunday! I hope your weekend is going fine so far. For me, I am having a blast writing about some of my favorite MMU companies. Today is our last entry in this series and I'm having a bittersweet moment right now.

Anyways, let's go back to Urban Apothecary, shall we? Founded in 1990 by Cheri Tracy, Urban Apothecary is a makeup company specialized in natural, botanical, and mineral makeup and skin care. It is not solely a MMU company but the Colorliscious Pro Pigments has become a favorite of MMU users. Recently, I decided to try some of their pro pigments and I was happy about their quality and here are the pros and cons:

Pros:
  • Finely milled MMU with pigmented colors: the texture of these eyeshadows are similar to those from Aromaleigh and their stuff are really finely milled (micro-milling). The color payoff, on the other hand, is a lot better than Aromaleigh's eyeshadows;
  • Interesting color formulas: some of the colors I have are duochrome and frost which change color according to the lightning
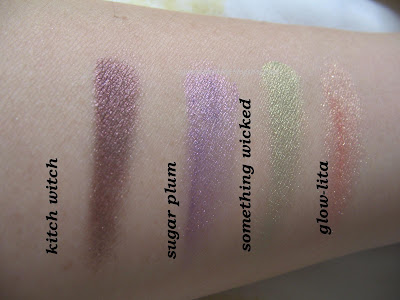
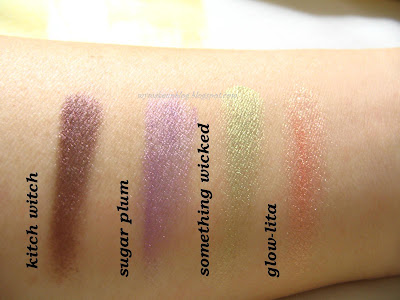
Of the four colors, Something Wicked and Sugar Plum have duochrome quality.
Glow-lita has shimmering quality while Kitch Witch is a bit frosty.

Same colors in different lightning.
Glow-lita is my favorite of the bunch
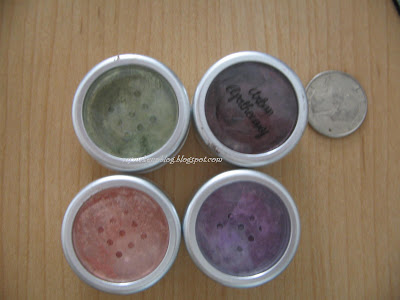
  • Products sold by weight, not volume: each jar is packed with 5 grams of pigments which will last you for a very long time
Top row: Something Wicked, Kitch Witch, and a quarter for sizing purpose
Bottom row: Glow-lita and Sugar Plum
  • Fast processing and shipping time: I received my order in less than a week;
  • Very good customer service: I emailed Urban Apothecary and got replied immediately. Kim Szlak, the site manager, is enthusiastic and willing to answer any of my questions.
Cons:
  • Pigments contain bismuth oxychloride: I did not notice any itches when I applied on my eyes. However, when applied on my lips, immediately I felt it. While I applied on my arm for the swatch, the itchiness feeling is there too. The reason I did not feel anything on my eyes as I always use MAC paint pots as my eyeshadow primer all the time. They probably shield my skin from the bismuth compound. Yay for paint pots!
  • Shipping rate is expensive: UA probably has the most expensive shipping rate of all the companies I've ordered probably because their products are big in sizes.
My rating: B+, would be A or A+ if bismuth oxychloride is excluded.

Urban Apothecary also has other traditional makeup and skin care items. Their top 3 products are Mineral Sheer Tint which I want to try, Indelible Gel Eyeliner, and Mineral Sheer Lipstick with SPF 15. This company although relatively unknown to the mass, has quite a crowd devoted followers. Soon they will launch a website just for Pro Pigments and will have more colors and swatches. A joke about this company is: "Urban Apothecary is an urban company without the decay". Get it, Urban Decay?

=============

Series Closing Remark:

Ok, I start to sound like I'm in a scientific meeting, "closing remark"! But seriously, these are the last few points I want to make before we close down this series:
  1. Do your own research when it comes to makeup: as many companies these days claim their products are "pure", "natural", and "organic", the ingredients may indicate otherwise. Natural doesn't mean risk-free and bismuth oxychloride is a good example.
  2. Know yourself and your allergies: if you are allergic to some certain ingredients, even if the product claims it's good for you, stay away from it! Don't expose yourself to such compounds in the name of vanity.
  3. Take shipping and handling cost into consideration: if a product is cheap but the shipping cost is high, you may find the same thing at another website with cheaper shipping cost. Think about the order in total amount, not just the pre-shipping cost.
  4. Take advantage of discount coupons and special offers: an extra google search may save you 5, 10, 15% or shipping cost. That's money saved for other things in life y'all! So why don't you google already?!
That's it, the end of your first edition of "7 days and 7 Nights". I hope you get something out of this series. Another series in the future, I don't know. Until we see the needs of another one, there are plenty of other products for me to review so this blog hopefully will not be something boring.

If you have any questions about MMU, please let me know. If there are a lot of them, I may address them all in an entry.

Have a restful Sunday and a wonderful week ahead,
Your Makeup Blogger
Saturday, July 19, 2008

7 Days and 7 Nights of Mineral Makeup: The She Space

Happy Saturday and welcome to the penultimate entry of "7 Days and 7 Nights of Mineral Makeup"! I hope you're ready for this one because this entry may change your lives of save some money on your wallets.

Enters The She Space, a very unique MMU company that I've experienced. Heather, the owner of The She Space, offers her customers high quality, pigmented, and trendy colors with affordable price. I've heard about this company for a long time but did not get to experience their highly pigmented eyeshadows until recently. Unlike other companies, The She Space called their eyeshadows "powder pigments" which makes me think of MAC pigments.

Like many other MMU companies, The She Space allows their customers to sample all the products except their lip junks with a very affordable price: $.50 USD per sample! On top of that, their samples are very generous.

Here are the lists of pros and cons on The She Space eye pigments:

Pros:
  • Higly pigmented: almost made me forget about MAC, my favorite makeup company;
  • Has a variety of colors: last time I counted, they have about 150+ colors that covers all the color spectrum;
  • Has different formulas: matte, velvet (which I love), sparkles, twinkles,...
  • Offers affordable samples: for 50 cents per samples, you are allowed to try as many colors as your heart desires. On top of that, the samples are generous;
  • Has a custom pigment jar that allows you to create your own color renditions;
  • Packed in clear-lid jars: this is my pet peeves when it comes to MMU because I don't want to flip the jars to see the colors. Having clear lid jars allow me to identify the colors immediately.
  • Affordable shipping rates: shipping starts at $1.75 USD and you can spend up to $20 USD to be in that rate, that's 40 samples y'all!
Cons:
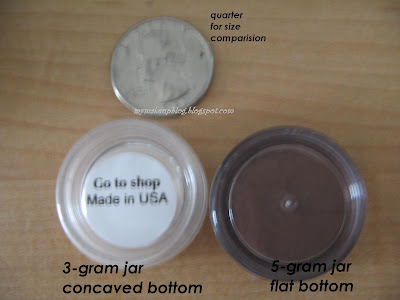
  • Packed in tiny containers: while most companies pack their eyeshadows in 5-gram jars (same size as MAC sample jars), The She Space sell their eyeshadows in 3 gram jars. These are the same jars that EM pack their samples.

  • Slow processing time: although the website stated a 10-day processing time, I got my order in 18 days!
  • Not-so-good customer service: I contacted Heather, the owner, twice regarding my order and never got a reply from her. Since there are so many MMU companies out there, consumers really have a lot of choices these days when it comes to makeup. I am quite put off by this company's customer service. If their products are not so good, I would never placed another order on their website.
My ratings: A+ for the pigments, C for customer service and processing time.

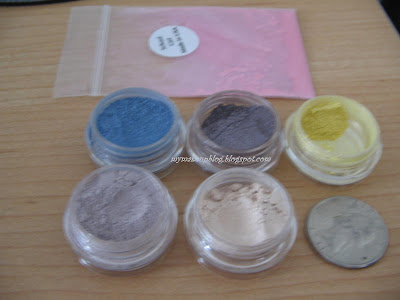
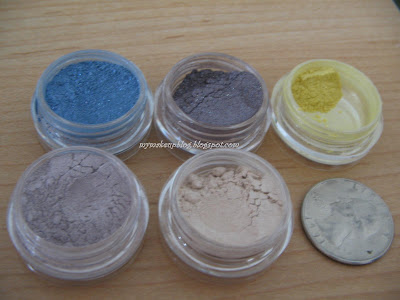
The colors that I ordered
Top row: Risky Rebel (custom color), Happy Birthday Chris, and Follow the Sun (sample)
Bottom row: Living in Color, Go to Shop, and a quarter (for size comparison)

The same colors with a pack of sample pigment in School Girl

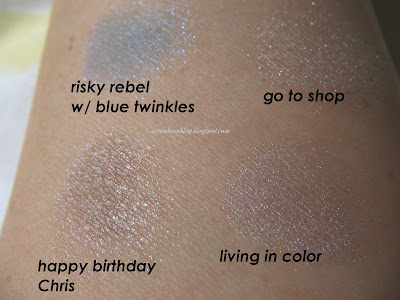
Swatch of the full-size colors, notice how velvety Go to Shop looks

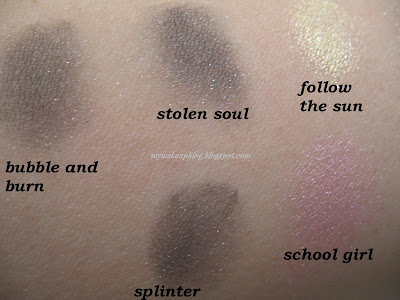
Swatch of the samples.
Bubble and Burn, Stolen Soul, and Spinter are 3 special colors made from black pigments and coated mica. Unless applied wet, you don't really see the difference.

From the number of pictures this post has, you can clearly see how much I love these pigments. Only if the processing time and customer service are better that The She Space will become the top MMU company.

Wee, one more entry and this series will come to an end. I'm glad I made it so far! Enjoy your Saturday and stay tuned for tomorrow.

With Love,
Your Makeup Blogger
P.S: "Happy Birthday Chris" and "Living in Color" are a duo that Heather dedicated to Chris, a boy who has cystic fibrosis. With every purchase of the duo, $3 USD will be donated to the Cystic Fibrosis foundation. So if you decide to make a purchase from The She Space, please consider this duo.
LinkWithin

Related Posts with Thumbnails