Thursday, July 30, 2009

Hair of the Week

Hi everybody,

Some days are really strange to me: I get to do the perfect makeup, strike the perfect pose, and have the perfect hair. Now, for makeup I can do them well almost every time. The poses almost work well most times. But the hair is still a mystique: it seems to have its own brain or something. Even when I use the same products, my hair behaves differently each and every day. And it likes to taunt me, as well: I almost never get nice hair when I need to look put together. Talking about frustration, right?

So when a perfect day happened, you bet I took pictures to show. A boat load of it, to be precise.

Le makeup
Guess what I used on my eyes!
(Will blog about it on another day, this is too good to pass!)

And now, le cheveaux!

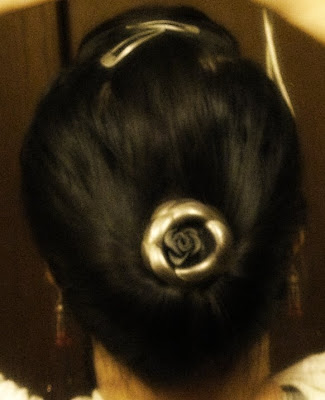
Seriously, I did this!

A closer look at the style

I made a hair bump on the front and tied it down with two clips. To be honest, the clips are not the most glamorous things I can use but it does not hurt my hair so badly as the other more pretty ones. Then, I did a simple updo using an old hair tie that I bought some years back. (Remember kids, don't throw away your pretty hair thingies, even when you cut your hair really short! You simply never know when you'll want to grow your hair back!)

To do this, first you tie your hair in a pony tail with the elastic (the rose hair thingy has an elastic band attached to it.) Then, you gently pull the elastic band out to make it a bit loser. Using your finger, split the hair before the elastic into two parts and make a hole. Then put the rest of the hair that hangs out inside that hole and makes sure none of them falls out of the hole. Fix the rose so it centers your hair.

And voila, you got a chic hair updo!
It took me a lot of work to have some decent photos of the hair. I know my direction is almost next to no good but as soon as I find a decent video clip online, I'll let everybody know. This is a really easy hairstyle.

I try to find a video for the hair and since I don't know what this look is called, I can't find one T_T. If you know the name of this updo style, please let me know.
Photobucket

P.S: If you like my blog, please subscribe to my feed. Thanks a lot!

Wednesday, July 29, 2009

Some Mineral Makeup Tips For You

Hi everybody,

When I started writing this blog, I was very passionate about mineral makeup. I even did a week straight to review mineral makeup companies that I experienced called Seven Days and Seven Nights of Mineral Makeup (click here for a trip to the past!) Since then, my mineral makeup stash has grown like mushrooms after the rain. I finally found my perfect foundation (Adorned with Grace minerals in Grace 3.5, yay!), and thank to that, my pictures look a whole lot better now. However, I realize I haven't done much on mineral makeup after the minerals week and I do have so much to give. So, today I decided to write things down before I forget all about them. I hope these tricks will help you to look as flawless as possible.

1. Brush size, thickness, and materials:

I've come to some conclusions regarding makeup brushes used to apply mineral foundation
  • The bigger the brush, the wider the area of application;
  • The denser the brush, the more material it can pack;
  • The more synthetic the bristles are, the less material lost to the brush.
So, if you are in a hurry, a flat top brush made of synthetic taklon is perfect. Currently, I'm lemming the Everyday Minerals flat top and the E.L.F Studio powder brush. From what I've heard, they are really good brushes for mineral makeup applications and the E.L.F one is really cheap!

2. Be a Powder Puff Girl:

Image courtesy Robert Jones beauty

Before becoming a Powder Puff girl, I used to apply my Sunlight kaolin clay powder with a kabuki brush. Regardless how careful I applied, my mineral foundation always ended up looking like a tragic accident by the end of the day. It's not that Sunlight does not do its job, it's me who did not apply enough of it on my face so the clay can absorb the oil from my skin.

After busting out a velour powder puff from my stash, which just sat there looking pretty for years, my life changed dramatically. Ok, I was kidding, at least my makeup looked a lot better after that. The velour puffs are washable and can pack a mean amount of powder there.

Now, instead of looking shiny at 3pm, I can feel comfortable until I go home. The velour puffs are that good!

3. Skunk it up:

I mean, by using a skunk brush- not by using a skunk to apply mineral makeup to your face. A skunk brush is kind of nice: you can stipple your wet mineral foundation on your skin or apply finishing powder with it as well.

The how-to on making a wet mineral foundation is here. And you need to try your dual fibre brushes with your finishing powder (or mineral veils). It makes your skin look really dreamy.

4. Order matters:

In the old world of conventional makeup, you apply powder last, right? And some mineral makeup companies told you so, too (at least Bare Minerals told me that!) But please don't listen to them because you will end up loooking like a clown if you do so. If you contour your face and apply your powder afterwards, your contour lines would be gone. If you apply blush and then powder, you'll end up looking really pink (or red).

How did I know?

I learned it the hard way: after spending time to contour and apply blush, my face ended up looking extremely bad once I applied finishing powder. The blush was all over my face and so was the dark contouring powder. Yikes!

From then on, I applied blushes and contouring powder after the finishing powder. It may sound strange to you but my makeup looks a lot better that way.

5. Always use a swirl bowl:

The swirl, tap, and buff routine that you always do in the lid of the mineral foundation jar? Forget about it! It's very unsanitize for you to do so. Imagine spreading whatever on your face to the brush, then dip it to the lid and back? Not only it is gross, you risk a chance to contaminate the whole jar of your precious minerals.

The good news is you do not need to have a fancy or special bowl to buff your makeup. I use a glass bowl used for dipping sauce as my swirl bowl (and make sure it's for makeup only!) The thing cost me 25 cents a piece and is there to stay unless it's broken. Also, if you use only samples, you don't need to worry if your brush is going to fit the tiny lid!

The swirl bowl with some honey-olive oil scrub

That's all for now. If I remember some more tips, I'll post them up as soon as I can. I hope you enjoy them and if you have other tips, please let me know.

Photobucket

P.S: If you like my blog, please subscribe to my feed. Thanks a lot!

Tuesday, July 28, 2009

HiP Eyes FOTD

Ciao bellas,

After more than a month of having the L'Oreal HiP kohl liners, I finally found some time to do a makeup look using them. May told me these liners are good materials to do the smokey eyes and I do agree with her.

"They rock," I said after the first try. However, they have more fall outs than the snow on top of Mt. Kilimanjaro if you're not careful. But when there's a will, there's a way. I found a way to apply these liners without making a big fuzz out of it: instead of holding it straight, I just apply it sideways. The fall outs simply reduce to next to nothing, ta-da!

Here's the look

Eyes:

  • Apply Rubenesque paint pot all over the eyelid as an eyeshadow primer, then using an eyeshadow brush like MAC 239, I applied Navy Kohl to the eyelid.
  • Using Sonia Kashuk blending brush, I contoured the eyes using NYX Oro.
  • Then I used Gold Kohl to line the upper and lower lashes (it's hard to see in the pictures but the liner was there!)
  • Finally, I curled the lashes and applied 2-3 coats of mascara.
Semi-close eye


Cheeks
Glamorous shimmer blush by Adorned with Grace minerals, applied with the small dual fibre brush (aka my MAC 188 look-alike.)


Lips
MAC Most Popular (from Hello Kitty) layered with High Tea


...and voila, I looked like this!


My "I'm dreaming of free makeup" look :)


If these liners were not as messy, I would have used it more often. Rubenesque does alter blue eye shadows a bit and Navy Kohl looks a lot like dark green than dark blue. I really enjoy playing with these colors: I've had Oro for a while but did not get to play with it as much. Also, I didn't apply any highlight colors underneath the brow bone as it would throw the look waaaay off. Oro and the HiP liners are really shimmery.


That's all, folks! What do you think? Please comment, alright?

Photobucket

P.S: If you like my blog, please subscribe to my feed. Thanks a lot!

Monday, July 27, 2009

MAC Fluidline in Blacktrack and New Use of an Old Brush

Hello there, everyone!

Happy Monday! As you already knew, this year I got myself some really cool birthday gifts from MAC, thanked to the sumo sale. After many years of applying makeup to my face, I resisted the power of MAC fluidline and bought some cheap gel liners instead. The results were sub-par because I have deep set eyes and oily eyelids. Most liners out there, whether they are powder, pencil, gel, or liquid, do crease a lot. I guess if any company out there want to test smudge-proof eyeliners, I am the perfect candidate.

It's antagonizing for me to have to find a good gel liner all the time. And after some rounds, I got tired. The Jane be pure mineral liner turned out to crease a lot while the Coastal Scent one is dried up like a raisin in the sun. Money I could have spent on a fluidline instead. So, with the mentality of "life is too short for imitations", I ordered Blacktrack.

Blacktrack in a box

Naked Blacktrack :)

Upside down Blacktrack

If you look from the drugstore product's perspective, Blacktrack is a couple dollar more expensive than a jar of HiP liner. If you look from a department store liner's side, Blacktrack is really cheaper than a lot of gel liners out there. Without the sale, a jar of fluidline costs $15 USD. The 25% off sale just sweeten it a little bit.

To me, Blacktrack is what it is supposed to be, plus a bit more. It is easier to maneuver than other gel liners I've tried (the one from Bobbi Brown included.) The pigmentation is perfect: Blacktrack is an intense true black liner and a little bit of fluidline does go a long way. I love the glossy finish a lot: I guess gel liners look more glamorous this way. To me, this gel liner lives up to its hype and I'm glad to have bought it.

The only concern I have is the creasiness: it does smudge a bit after a long day. However, I did not have severe raccoon eyes and it only happened during those 100+ degree Fahrenheit days. And don't forget I live in the South, where humidity and heat is high during this time of the year.

New Use of an Old Brush

American Painter 4500 Filbert brush #6

I remember mentioning about this taklon Filbert brush from American Painter when I wrote about my brushes. Although it's a nice brush, I did not find a lot of uses for it until one day I realize Bobbi Brown uses something similar as a gel liner brush. It's an "ah-ha" moment right there for me!

Close-up of this brush

"So, did it work?" you may ask.

Yes, my dear friend, it did. And very well, indeed! If I load up a tiny bit of fluidline, it gives me a nice small line. However, if I put a truckload of gel liner on it, I can get Amy Winehouse-esque winged liner as well. And this brush is really easy to clean.

Nice liner, right?

Semi-close eye

I used eyeshadows from the Summer LE of Adorned with Grace minerals. They are so pigmented and apply as smooth as butta! If you like this eye look, please let me know. I'll check the names and post the directions for you.

That's all for today! I hope you're having a wonderful week ahead.

Photobucket

P.S: If you like my blog, please subscribe to my feed. Thanks a lot!

Sunday, July 26, 2009

Sunday Beauty Reads

Hi everybody,

It's Sunday again and for the past month or so, the Sunday Beauty Reads have been a fixture of this blog. At first, I thought it was a good idea to include my most favorite post of the week into the mix with other beauty bloggers'. As time goes by, some of you guys confessed expressed your love to this and helped it become a fixture of My Makeup Blog. As I recalled, I was exposed to some really great blogs via this road, as well. So, I'm really glad you like the Sunday Beauty Reads posts and hope you'll find them useful.

It's complexion week at the Informed Makeup Maven. Don't forget to enter her cool giveaways this week!

Visit The Beauty Couch for a chance to win the amazing Perricone MD Advanced Face Firming Activator (a $120 value)!

Monique at Beauty Girl Musings reviews the new No Frizz Shampoo, Conditioner and Leave-In Conditioner.

Beauty Anonymous looks at Shiseido fall 2009 makeup collection.


Dao at My Makeup Blog found a new love with M.A.C Rubenesque paint pot.


Sicka Than Average checks the best facial sunscreens so you can play in the sun — without paying for it later.


More Than a Pretty Face is excited about the launch of Illamasqua at Sephora. Within a year of its launch at Britain's tony Selfridge's, Illamasqua has developed a cult following comparable to that of MAC or NARS.

Visit Lipgloss Break and Enter to win The Cure 24/7 hair treatment and Sunkissed Glow fragrance by JLo

That's all for this week, kids! I hope you're having a wonderful weekend so far.

Photobucket

P.S: If you like my blog, please subscribe to my feed. Thanks a lot!

Friday, July 24, 2009

Beauty Literotica: The Beauty of Color by Iman

Hello, gorgeous!

In 2005, Iman published her makeup book which she co-wrote with Tia Williams called “The Beauty of Color”. I remember sitting at Barnes and Nobles and reading it along other books and magazines and thought it was good. Then as soon as I walked out of the door, I promptly forgot all about it. Until years later, I saw this book at the local library that I remembered of that day.


I’ve always loved Iman as a model: she has this fierce and ageless look that not many models, regardless age or race, can have. I know Tyra Banks is the current epitome of fierceness but before her, Iman owned the term. It’s just that she didn’t say it.

“The Beauty of Color” is a beautifully photographed and well-written book on makeup. As the name implied, this book focuses on beauties in different skin tones. From light skinned to dark skinned models and celebrities, this book is a good source of inspiration to makeup aficionados.

How to get a good foundation match
(click to zoom)

The book can be roughly divided into three parts: skincare, makeup basics, and makeovers on celebrities and regular folks. On top of that, it was written in a friendly girlfriend to girlfriend tone. Sounds familiar? I think so, too! As I leaf through this book, I can’t help but have a sense of déjà vu. And what does it remind me of? The other two books that Kevyn Aucoin wrote: “Making Faces” and “Face Forward”.


The Fab Four face looks

From the way the looks were illustrated to this FabFour faces, it all screamd “Kevyn Aucoin” to me. When Kevyn did the makeup and took most of the photos in his books, “The Beauty of Color” was teamed with a ton of makeup artists and photographers. Whether they used IMAN Cosmetics products on the models is still unknown to me. Also, I can see some hints of photoshop here and there. Don’t get me wrong, this is still a good book but who can really write a makeup book these days without emulating Kevyn Aucoin. It’s hard when the last book he wrote, which was published nine years ago, is still considered an inspiration to the makeup industry today.

Inside “The Beauty of Color”, there are some familiar faces of models and celebrities that were still unknown back in 2005. I recognized Selita Ebanks and Oluchi, two current Victoria's Secret models, and Padma Lakshmi – pre Top Chef. It also featured some of my favorite celebrities: Liya Kebede, the Ethiopian supermodel and former face of Estee Lauder, Alicia Keys, my lovely Kimora Lee Simmons, and of course, Ms. Tyra Banks.

The fabulous Iman with a feather cap
Love it!

Liya Kebede

Tyra

...and Kimora

Here's a makeover of a woman in her 20s

Whether you are black, white, Asian, Latina, you can find at least one face that’s similar to yours. However, as my beauty philosophy is geared more toward “beauty without borders”, I think any look can be applicable on anybody – regardless of how you and the model look. This book is well written and the looks are not complicated. I highly suggest you to take a look at it the next time you go to the bookstore or your local library.

Photobucket

P.S: If you like my blog, please subscribe to my feed. Thanks a lot!

Thursday, July 23, 2009

Scents of a (Money Conscious) Woman

Hello, gorgeous!

On my birthday, one of my cousins wrote this on my Facebook wall:

“Happy Birthday to you! You live in a zoo…you look like a monkey…and smell like one too!”

Of course, this new verse of the “Happy Birthday” song came from the movie Madagascar. (And my cousin didn’t mean any harm.) While it’s all good, the song brought to my attention what I actually use to perfume myself. I own a lot of perfumes through the years. Each year, I usually get two to three bottles of perfumes – the real stuff, not those cheap body sprays. Yet, I don’t use the real stuff as much. While I don’t have skin allergy to perfumes, they do make me feel nauseated after 3 days of consecutive use of the same scent. And I want to smell good!

And you’ll be really surprise of what I use. They are really cheap and may not last as long as EDT or EDP. But whenever I wear them, I smell good!

Scent #1: Body Fantasies Vanilla Fantasy Fragrance Body Spray


Body Fantasies body sprays are like candied crack. They are cheap, they smell good, but they don’t last long. I think they are the drugstore Demeter but you get more volume with the same amount of money. These sprays smell surprisingly good and the lasting power is not too shabby. I was exposed to Body Fantasies through a scent called Fresh White Musk. To this very day, it’s the only musk scent that does not smell dirty on me.

As far as vanilla scents go, most of them tend to smell dirty after half an hour wear. At first, they would go really nice and cheery to make me feel like a cheerleader. But as soon as I start to sweat, the vanilla scent would go rancid like old leftover cookies nobody wants.


But Vanilla Fantasy is different. It goes out smooth and sweet, and stays the same until the very end. And I do feel like a cheerleader when wearing it! As far as aromatherapy goes, vanilla makes people feel comfortable and open. It can be sensual when pairing with ylang-ylang.

A big bottle of Vanilla Fantasy costs around 6 dollars but I got it for a buck during Wal-Mart clearance sale! If you wait until Christmas, you can get 3 mini bottles of Body Fantasies sprays for 4-6 dollars! And if you wait ‘til the day after Christmas, it can be really really cheap! I’m just sayin’…if you can wait that long :)

Scent #2: Old Spice Classic Aftershave

That's a bottle of Old Spice sitting on top of a Q- Tips cube :)

Ok, please don’t weird out! I know what I’m doing; this scent is an accidental finding to me. As you know, I love the smell of Aveda Brilliant shampoo and conditioner. I love it so much that I wanted to buy the bottled scent to use. But after asking and sniffing around the display area of Aveda Institute, I gave up! So far, Aveda does not bottle this scent of Brilliant to sell to the public. I know my nose is good but to mix ylang-ylang, rose, jasmine, and God-know-what essential oils together to create the scent of Brilliant is not a brilliant idea. I prefer to buy and use it instead.

Then, one day I wandered around Target and saw some bottles of Old Spice on sale. Now, one of my cousins used to wear Old Spice aftershave and I remember to love the glass bottle very much. Yet, I did not recall the scent. Over the time, Old Spice came up with different variations of the scents and all of the sudden, aftershaves all smell the same to me: cloying and tacky. But curiosity got a better part of me and I found myself opening that bottle of Old Spice and rubbing a bit of it to my wrist.

Ka-bam!

It smells really lovely and familiar. But my famished self could not put one and one together. I left the bottle behind and went to find some food. Then the scent hit me in the head: Old Spice Classic is Aveda Brilliant! So I bought it, happy as a clam!

To be honest, these two scents are very close: Old Spice Classic has more spice in it (duh!) while Aveda Brilliant is more flowery (double duh!) When Old Spice dies down a bit, the familiarity is astounding. I don’t know who moonlighted whom but I was happy to spend those three dollars plus some change for my Old Spice Classic.

The lasting power is short, as it is an aftershave. I do feel good when wearing it and have no skin irritation whatsoever. While it remains a puzzle, I wear some spicy-woody male fragrances well. If I don’t tell you, you would not know they are male perfumes at all. I guess my body chemistry makes them smell sweeter and more feminine.

Honorary Mention:Avon Sweet Honesty

Image courtesy Avon.com

Although this scent is not really cheap like the others, you can always find deals at Avon website to offset the cost. It smells like baby powder but not in a premature way (or an old-fashioned way either!) I find Sweet Honesty to be quite endearing and like the other two, I don't get tired of it.

How about you? What are your budget-friendly scents? Please tell me, I'd love to hear about them!

Photobucket

P.S: If you like my blog, please subscribe to my feed. Thanks a lot!

Wednesday, July 22, 2009

Third Giveaway Winner

Hello everybody,

Although I was supposed to announce the winner of My Makeup Blog's Third Giveaway on Monday, I was totally busy. For those who've followed me on Twitter, my mom just came to visit on Sunday and she got motion sickness after sitting in the plane for too long. So Monday and Tuesday was for mom to get better and stuff (and for me to get used to sleeping in a living room, as well!)

So, I hope you don't mind me to announce the winner today. I actually picked out on Monday but didn't get a chance to post things up. Again, I'm using Random.org to select the winner and...

...the prize goes to lucky commenter number 20.
You can click here to see the order of your entry.

Congratulations to the winner, I'll contact you shortly. For those who joined this giveaway: thank you for your support and I hope you continue to be my readers. And don't worry, there will be other opportunities in the future for you to win stuff.

Take care, everyone! And have a nice day!

Photobucket

P.S: If you like my blog, please subscribe to my feed. Thanks a lot!

Tuesday, July 21, 2009

Rubenesque Paint Pot: Golden Peach Shimmer Goodness!

Hi everybody,

I just widened my vocabulary courtesy of MAC. I’m not kidding, the way MAC named their products make me feel smart already. Let’s learn, shall we?
Rubenesque
Pronunciation:\ˌrü-bə-ˈnesk\
: of, relating to, or suggestive of the painter Rubens or his works ; especially : plump or rounded usually in a pleasing or attractive way (a rubenesque figure)
About a year ago, I wrote about the marvel of paint pots. These products really changed my makeup life as they allow eye shadows to stay until I take them off. While paint pots are eye shadows, they make extremely good bases. At the time I started to get into them, around February 2008, MAC started to streamline their products and as a result, some colors disappeared. I was lucky enough to get Cash Flow and Perky from the Fafi collection. After that, I haven’t seen a new paint pot surfacing from a new LE. The closest MAC came to release a new paint pot was the Ungaro collection but the nixed it at the very last minute.

As much as I love to own some colorful paint pots, the ones in their regular lineup are plenty of fun to play. I’ve been eyeing Rubenesque ever since I got Bare Study. In fact, if I decided to get Rubenesque instead, I would not have gotten Bare Study that I have been using very frequent.

MAC Rubenesque

MAC Rubenesque bottom-up ;)

While its golden peachiness makes it an intimidation to the eyes, this color is surprisingly wearable. To me, it blends right in and leaves no hint of color behind. I guess my skin has both golden and pink pigments in it, which makes this shade so perfect. The new Rubenesque blends smoothly and feels more moisturizing than the other paint pots I have. I don’t know whether MAC made any changes to their products or this is a new pot but it feels really good to apply this Rubenesque on my eyelids. And like the other ones I have, it last and last all day long.


And now there are five of them…

Can you name them all?

Ok, here they are!
I guess Rubenesque can be duped by mixing Perky and Cash Flow. Whether you find them is another problem as they are long gone LE items.

And here’s a skin swatch for those who look for preference
Top row, L-R: Painterly, Bare Canvas
Bottom row, L-R: Perky, Rubenesque, and Cash Flow
Picture taken with natural light and without flash

I’m glad to hold on to the idea of owning Rubenesque: it is really great! The Sumo sale just made it easier for me to get it. Right now, I’m eyeing on Delft, the only bright color left in the line up. Well, we all have the next Friends and Family sale, don’t we?

What do you think about Rubenesque and MAC paint pots? Please comment and let me know!

Photobucket

P.S: If you like my blog, please subscribe to my feed. Thanks a lot!

LinkWithin

Related Posts with Thumbnails